Adding line items to your template
Now you've created your first template, we're diving in with more detail about how to do some even more advanced things with your line items.
There are three ways to add line items to your template in LinePilot:
- Add Single Product - this allows you to select a product from your HubSpot product library
- Add Product Selector - this sets up a deal property that allows users to choose a product from a list
- Add a Custom Item - add a new line item from scratch without needing a product

Using HubSpot products
Using products that are already set up in your HubSpot account is a great option if you're already using HubSpot products. It means you can keep all your data in one place, and if you need to make changes to descriptions, pricing etc, you can do all this inside HubSpot without needing to change LinePilot. It's also really useful if, like many people, you're syncing this product data from your ERP or accounting platform.
You can search for a product by using the name or the SKU code and it will get added as a line item on your template.
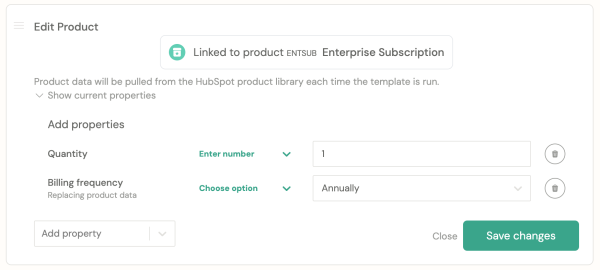
When LinePilot runs, it will grab the values for the product from your product library, before updating your deal. This means it'll always use the most recent data. LinePilot will add any properties that you've configured on that product (which you can preview by clicking "Show current properties").
The only mandatory property to set is Quantity. But, you can also use LinePilot to set any additional properties - which will override what's inside the product library. For example, if your product's billing frequency is monthly, but you want the line items in this template to be annual, you could configure the billing frequency property.
Setting line item properties
If you're adding a blank line item you'll need to add in a Quantity, Name and Unit Price, but apart from that the process is exactly the same.
To add extra properties just choose "Add property" - you'll see a list of all the properties on your line items that you can set, such as Billing Frequency, Term, Discount. If you're on our Pro plan you can even define custom properties inside HubSpot and populate them as well. You'll see when adding properties you can either enter text, number or choose from an option, depending on the type of property you're using.
Using dynamic data
One of the most powerful features of LinePilot is using dynamic data to set your properties. Alongside selecting a static value such as text or number, you'll also see the option to "use deal property" instead. This means that when LinePilot runs it can pull data in from your deal to populate the property.
This is really powerful as it means you can make your template dynamic, based on the properties in your deal. Deal properties are also really accessible, you can get users to populate them when deals change stages or make them mandatory when creating deals.
Here are a few examples:
- Use a "Deal discount" property to discount line items by populating the "discount percentage" line item property
- Create a deal property for "onboarding costs" and populate this as one of your line items by filling out the unit price
- Copy a contract start date into billing start date
- Copy the business unit from a deal into a line item property for easy reporting
For dates - we even have a dedicated date function that lets you pick today's date, or the start and end of the month. If you want to get really complex - you can even create your own calculated property on your deal where you can combine logic, and use the output of this to populate your line items.
When using dynamic data - you need to be aware of the data types, for example, if you're filling out a number field such as price and the output of your deal property is text, this could cause problems.
You can also combine text and dynamic properties by using deal properties as tokens. For example, if you wanted to write the name of the Training Location in the line item description, and this was stored in a deal property - you could choose "Enter text" and type "Training Location - {{training_location}}" - where training_location is the internal name for your HubSpot deal property. If you don't know the internal name, you can find it by going to edit the property in HubSpot, and clicking the </> icon next to the label.
Previewing your data
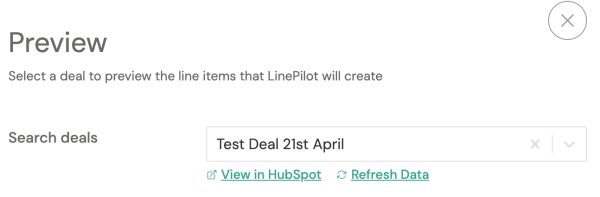
Once you've filled out your line items - you can use the preview function in LinePilot to check the data has been filled out the way you want. This means you can quickly change things without needing to configure the triggers each time. Just head to the top of the template and click Preview, and search for any deal. Once selected, the line items will be calculated and the output shown on screen. This uses the same data engine as the triggers, so will always give you the same values.
What's next?
The next step is to dive into more detail all about how to use triggers and workflows. Remember our team are always on hand if you need help figuring things out.